PrintLimit Print Release Station - Frequently Asked Questions |
||
| 1. | Q. How can I set up a printer on PrintLimit Print Release Station? | |
| 2. | Q. How can I lock the computer when PrintLimit Print Release Station is run as User Mode? | |
| 3. | Q. The popup doesn't show up when I print. How do I fix it? | |
| 4. | Q. Why do print jobs remain in the queue after printing? How to fix it? | |
| 5. |
Q. Can I run Print Release
Station with the user account that doesn’t have administrator
permission on the PrintLimit Print Release Station computer? |
|
| 6. | Q. Can I preview the print job before I release it? | |
| 7. |
Q. The print job sent from Windows
7 computers show their MAC address, for example, [fe80::5002:d65d: a3ea0:ef74]. How to show the correct computer name? |
|
8. |
Q. Can I control the print jobs for the mobile devices (for example, Windows wireless laptop, Android, Mac wireless laptop, iPhone, iPod or iPad)? |
|
|
|
||
| 1. | Q. How can I set up a printer on PrintLimit Print Release Station? | |
|
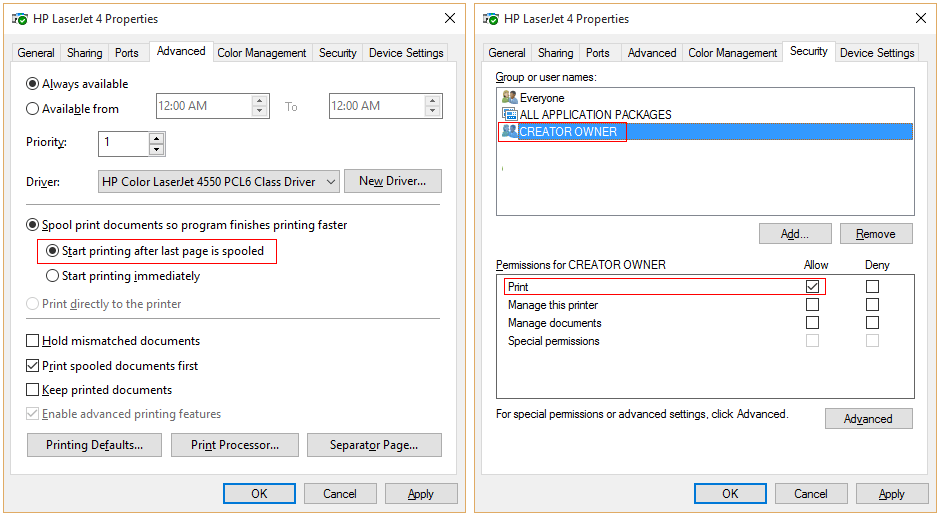
A. The printer must be shared on PrintLimit Print Release Station and other workstations print to the shared printer. Uncheck "Render print jobs on the client computers" and select "Start printing after the last page is spooled" in the properties of the printer. Assign “CREATOR OWNER” only “Print” permission in the “Security” tab. For details, please see the step by step at Printer Setup on PrintLimit Print Release Station.
|
||
|
|
||
| 2. | Q. How can I lock the computer when Print Release Station is run as User Mode? | |
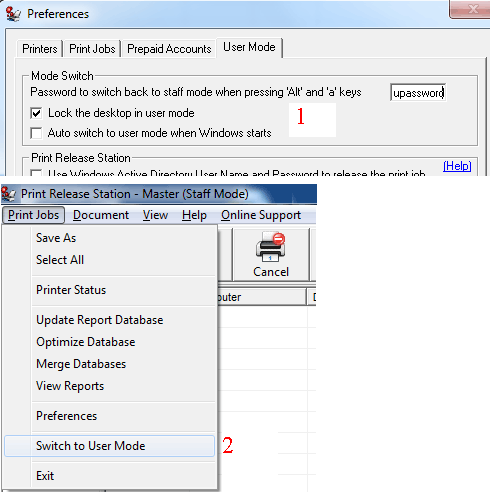
| A. If Print PrintLimit Print Release Station is installed on Windows 2000 or Windows 2003: Step 1. In PrintLimit Print Release Station Preferences -> User Mode, select "lock the desktop in User Mode. Step 2. In PrintLimit Print Release Station menu Print Jobs, click "Switch to User Mode".
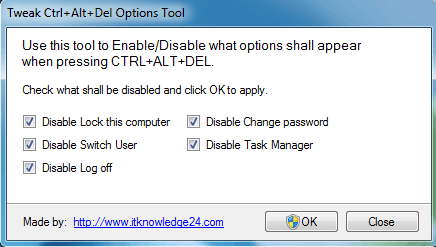
If Print PrintLimit Print Release Station is installed on Windows Vista/2008/7/8/2012/10 or later: Step 1. Download and extract free tool https://www.printlimit.com/download/editctaldl.zip. Run editctaldl.exe and select all options and click OK.
Step 2. In PrintLimit Print Release Station Preferences -> User Mode, select "lock the desktop in User Mode. Please see above picture 1. Step 3. In PrintLimit Print Release Station menu Print Jobs, click "Switch to User Mode". Please see above picture 2. |
||
|
|
||
| 3. | Q. The popup doesn't show up when I print. How do I fix it? | |
| A. Solution 1: If popup doesn't work on all client computers, the Windows firewall settings may prevent PrintLimit Print Release Station from sending the message to the popup installed on the client computers. On the computer where has Print Release Station installed, add "printczrm.exe" (e.g., C:\Program Files (x86)\PrintLimit\PrintLimit Print Release Station\printczrm.exe) to the exception list of Windows firewall settings (Control Panel -> Windows Firewall).
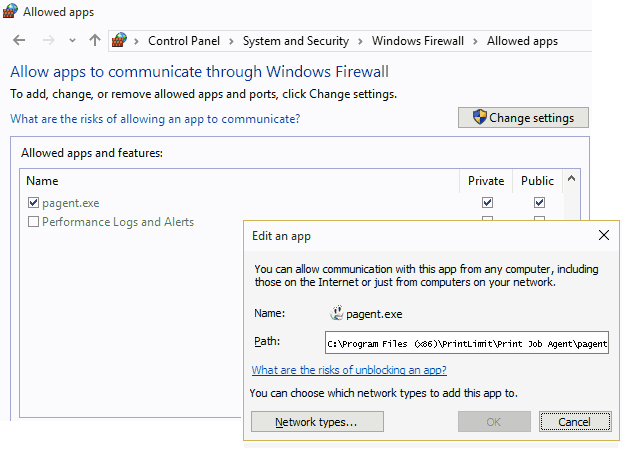
Solution 2: If the Popup on a client computer doesn't show active in PrintLimit Print Release Station Preferences --> User Mode --> Check Popup Status, go to that client computer, open C:\Program Files (x86)\PrintLimit\Popup\release_ip.ini, enter the IP address or computer name of Print Release Station and save, then log off the client computer, login back and check PrintLimit Print Release Station Preferences --> User Mode --> Check Popup Status. Solution 3: The Windows firewall settings (Start --> Control Panel --> Windows Firewall) on Windows may prevent popup from connecting to Print Release Station. When the popup is installed and run the first time, it will be added to the exceptions automatically. If not, add "pagent.exe" (e.g., C:\Program Files (x86)\PrintLimit\Popup\pagent.exe) to the exception list of Windows firewall settings (Control Panel -> Windows Firewall). If it is already listed in the firewall exceptions list, you can remove it and add it again, then test.
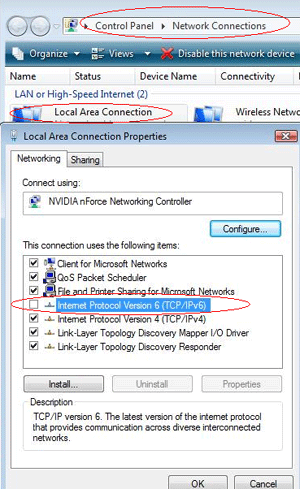
Solution 4: The antivirus software firewall settings may prevent popup from connecting to server Print Release Station. Please add "pagent.exe" (e.g., C:\Program Files (x86)\PrintLimit\Popup\pagent.exe) to the exception list of antivirus firewall settings or add an exception for TCP port 14228. Solution 5: If popup still doesn't appear after you try above solutions and the computer name of print job shows the MAC address, for example, [fe80::5002:d65d:a3ea0:ef74], uncheck "Internet Protocol Version 6 (TCP/IPv6)" on the computer that has PrintLimit Print Release Station installed, then test again.
|
||
|
|
||
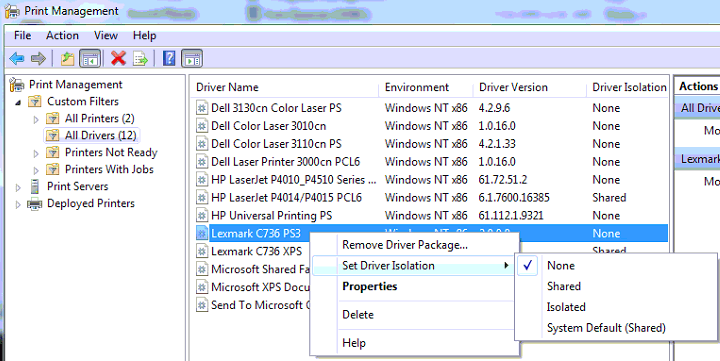
| 4. | Q. Why do print jobs remain in the queue after printing? How to fix it? | |
| A. On the Windows computer that has PrintLimit Print Release Station installed: Step 1. Go to control panel -> administrative tools --> Print Management Software. Step 2. Right-click the printer driver you are using, select None in Set Driver Isolation.
|
||
|
|
||
| 5. | Q. Can I run PrintLimit Print Release Station with the user account that doesn’t have administrator permission on the PrintLimit Print Release Station computer? | |
|
A. Yes. The user account that runs PrintLimit Print Release Station doesn’t have to be an administrator account, but it needs the “full control” permission on the following folders: C:\czdata, C:\temp and C:\Program Files (x86)\PrintLimit (Right-click the folder -> Properties -> Security). The user account must also have “full control” permission on the printers (Right-click the printer -> Properties -> Security). If you allow the user account to change PrintLimit Print Release Station settings (Preferences), it also needs the “full control” permission on registry HEKY_LOCAL_MACHINE\Software\PrintLimit Print Release Station (Start -> Run -> regedt32 -> Select HEKY_LOCAL_MACHINE\Software\PrintLimit Print Release Station -> Click Security). |
||
|
|
||
| 6. | Q. Can I preview the print job before I release it? | |
| A. Yes. If you can't view the content, click menu Document -> Test PDF, test Preview 1, Preivew 2 and Preview 3 one by one., If you still can't see the content of the print job, please email the name of your printer driver to support@printlimit.com . |
||
|
|
||
| 7. | Q. The print job sent from Windows 7 client computers show their MAC address, for example, [fe80::5002:d65d:a3ea0:ef74]. How to show the correct computer name? | |
| A. Please uncheck "Internet Protocol Version 6 (TCP/IPv6)" on the computer that has Print Release Station installed.
|
||
|
|
||
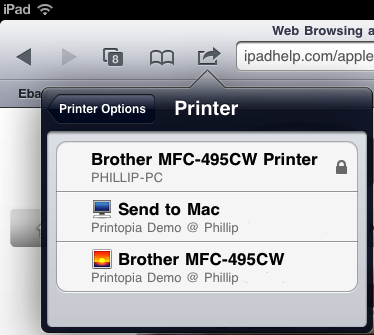
| 8. |
Q. Can I control the print jobs for the mobile devices
(for example, Windows wireless laptop, Android, Mac wireless laptop, iPhone, iPod or iPad)? |
|
|
A. For Windows wireless laptop, go to Control Panel -> Printers and Devices -> Add a network printer (e.g., \\PrintReleaseStation\SharedPrinter). For Android device, add the printer through "Add Printer Option ->Network Printer" and point to the shared printer on Print Release Station. For Mac wireless laptop, iPhone, iPod or iPad, do the following on the Print Release Station that has the printer shared: 1. Make sure you have iTunes or Bonjour Printer Services installed. 2. Download WindowsAirPrintx86x64.zip . After extraction you should have three files: - "AirPrint_Installer.exe" - "AirPrint iOS 5 FIX - 32Bit.reg" - "AirPrint iOS 5 FIX - 64Bit.reg" 3. Run "AirPrint_Installer.exe" and then click on "Install AirPrint Service". 4. Run the "AirPrint iOS 5 FIX - 32Bit.reg" or "AirPrint iOS 5 FIX - 64Bit.reg" to install the iOS 5 fix (Choose the correct file for your operating system, 32 Bit or 64 Bit Windows). 5. Go back to "AirPrint_Installer.exe", make sure "Service Startup" is set to "Auto" and click "Start". 6. Make sure any firewall software is set to allow AirPrint. 7. Restart Print Release Station that has the printer shared. When users print a document from an iOS device (Mac wireless laptop, iPhone, iPod or iPad ), the printer should show up when they tap on the AirPrint icon. When they tap on the printer, they should get a pop up asking for the username and password; it will be whatever you entered in the AirPrint Installer.
If you have problems with the iOS device discovering your printer, try rebooting your Print Release Station or restart the Bonjour & AirPrint service by going to Start -> Run -> services.msc (Click OK) -> Right Click “Bonjour Service” -> Click Restart. (do the same for AirPrint Service). If there is a locked icon next to the printer on the iOS device (Mac wireless laptop, iPhone, iPod or iPad ) enable the guest account in Print Release Station (Control Panel -> User Accounts -> Manage Another Account -> Turn the Guest Account on). Then in the "AirPrint_Installer.exe" choose to use Guest Account Auth and tick the "Enable Guest Account" box. Then click "Update". You will then need to restart.
|
||